June 3, 2013

Eggs in a Sausage Nest

Eggs in a Nest
Needed something around for Monte to snack on. I'd seen this idea online without details. After seeing lots of other recipes that sounded good from the same book . . . I ordered it - Eat Like a Dinosaur. Though I don't just eat Paleo, I'd eat anything someone classified as Paleo. I've not tried anything else from the book, nor really read anything. Thumbing through ... I like the looks. So that's all I can say about it.

We get pastured meat from our raw milk dairy (can't ever eat meat from stores again - so spoiled!) - beef, pork and occasional chickens. The eggs are from our own chickens - so spoiled there too, especially since they eat a special feed that has no corn or soybeans, thus no GMO, but higher quality grains, lentils, peas and herbs, and of coarse all the household chicken scraps including fermented stuff (like old bread, soaked cereal, crepes, kefir grains, ginger from brewing ginger ale . . .). 


EGGS IN A SAUSAGE NEST

1/2 lb quality breakfast sausage (pastured animal best)
12 eggs
2 Tb olive oil


That's the book's ingredients. Use a soup spoon to get about a tablespoon of the sausage meat. I used my hand to start spreading thin, then finished pressing into muffin tin filling it up the sides. Next time I'm not using the silicone fillers you see pictured - they are too small and the egg goes over making a mess of the tin. Nice idea. I need bigger silicone muffin thingys - I think I'll just get a silicone muffin "pan".

You'll notice in the cooked nests that the sausage shrunk way down. So next time, with bigger muffin holes, I'll press the sausage up the sides higher. Anyway, crack the egg into the sausage nest. Sprinkle with seasoning. I used salt and pepper. Then drizzle on a bit of olive oil.

Bake at 350 degrees for 25-30 minutes - to your liking. Let rest about 5 minutes. Use table knife to help release the nests if you didn't use silicone. And oh ... if you don't use silicone you should grease your tins.

Monte likes them!

May 23, 2013

Spring Season

Life is full, thus I've not posted. I'm going to post a string of photos to show what's happening. This is the season of new life: new chicks, garden cleaning and preparation and planting, greenhouse is full, learning the art of sourdough breads . . .

First campfire of the season

New Chicks

Is the snow done?!!!
Outside gardens cleaned up / outside greenhouse in background
Spinach and greens in outside greenhouse
Inside greenhouse is FULL!


Rock steps
Early color - Tarda Tulips and Grape Hyacinths
Hardening off cole family greenhouse starts
Mastering the Art of Sourdough bread making

April 15, 2013

Greenhouse

My greenhouse. This house/ sink wall will get finished off this year really nice. Brick floor is set in sand.
My greenhouse is attached to our home. You walk through it from our dining area of our great room to go outside to our pergola and backyard. It should just be a nice sitting area, but this time of year it functions as a greenhouse with lots of garden seedlings getting an early start.

Planting shelf with heat coils and grow lights.


The table height shelf in the greenhouse has heat coils installed to help seedling flats get a good start, then I unplug the heat coils as the plants are growing so to get them acclimated to cooler temps. Grow lights sit on this shelf.

Seedlings of broccoli, cauliflower, kale, collar greens, parsley, tomatoes, eggplant, flowers, herbs, chard . . .


We're going to dismantle the shelf this year once the Spring season of plant starts is over. I want it to be a nice room. The shelf and under it have become a storage area that I don't want to look at anymore.

Grapevine with Clematis, garlic chives, hostas, nicotiana, lilly of the valley, ferns ...
There is a sink counter on the house wall that will remain. The grape vine growing from the ground on the far end will remain. There's a nice raised brick area next to the window expanse with slatted wood top that would be pretty with potted plants on it.

Outside this window expanse is an outside greenhouse - like a tall cold frame. I've got salady stuff in there that didn't grow much over winter, but they didn't freeze and die. The plants are now taking off and we're starting to add them to our salads.


Lime tree and Fig tree, as well as Jasmine are in large pots on castors. Then there's geranium pots and herbs.
It's April 15 and snowing - 3 more days of snow to come!

April 9, 2013

Bacon-Wrapped Jalapeno Poppers

I've always loved jalapeno poppers. I've been seeing more posts on simply cutting them in half, which is brilliant. It is too hard to try and slit, remove seeds, and stuff. And then too, your first bite bursts it open and cheese oozes out all over. So this is now my "keeper" of an appetizer recipe!

Lonely, bacon-wrapped jalapeno popper


I saved out two for a picture, but Monte ate one. I made two batches in the past week. We were invited to new neighbors for grilled hamburgers and I brought the appetizer. Then Sunday, Dawson with some of his wife, Sarah's, family and neighbors, came to do Ukrainian eggs and a meal (see my post on Ukrainian egg dyeing tutorial). Dawson pulled the stored box of dyes from the garage, set it up and cleaned it up - thank you Dawson!

I made a meal of roasted brined chickens over a bed of roasting veggies, salad with homemade salad dressings (one a dairy kefir caesar I love, and need to post about), and homemade bread. But I did the jalapeno popper appetizer first while prepping the chickens and veggies.

Bacon-Wrapped Jalapeno Poppers

About a dozen jalapenos - stem, cut in half, and de-seed (wear gloves!)
8 oz of cream cheese, room temp
1 cup shredded cheddar cheese
1# bacon - cut in half

Fill each pepper half by pressing in the cream cheese and then press on the grated cheese. Wrap each with bacon half, stretching it to wrap around once or twice, ends to the back, and set on baking pan to bake at 450 degrees till bacon is done - about 15-25 minutes. Serve.

I usually buy everything organic or pastured. Our Costco carries the Kerry Gold Irish Cheddar Cheese (as too, their butter) which is pastured - and I stock up on them! I also get bacon without the nitrates, hormones and antibiotics as well.

Shared with: Simple Lives Thursday, Homestead Barn Hop, Granny's Vitals, Food Renegade, Tasty Traditions, Clever Chicks Blog Hop, Traditional Tuesday

Living Out of a Suitcase

Daughter Heather
Monte and me took a road trip. We first visited our daughter and two grandkids. We helped get their gardening spaces planted with veggies. Monte and Bill with four-year-old Will went and got soil prep ingredients, and once home prepared the soil for planting. Heather and me with one-year-old Bridget went our way to get plants and seeds.

Grandson Will
Plant starts, even including lettuce, I felt would be easier for Will to keep out of the beds, as he's been used to playing with his trucks and cars in the dirt. I put the plant markers by the plants and showed Will the pictures of the "fruit" from veggies to flowers, and we talked about them. I had him help me plant the pole bean seeds around bamboo teepees we poked into the soil, hoping this too would help him avoid playing in the dirt.

Granddaughter Bridget
Heather called and said seedlings were coming up. Oh to have a longer growing season. We're still getting snow! I have started seeds in flats in my greenhouse tho. That's how I get my urge for getting my hands in dirt, and an early start for my short season. And my outside greenhouse salad ingredients, though dormant during winter, didn't freeze, is taking off. I need to take a current picture.

Next enroute was Sonita Arizona to stay with Monte's geology "partner" (tho both individual consultants they tend to do most projects together). Being close to Tucson I spent a day with my sister and Monte came for supper to visit and drive me back to Stan's. Tucson is where I spent most of my growing up years. Monte came for graduate school and met me. Before moving to 8000 feet in Colorado, we'd built a home in the Tucson Mountain desert. So I've gardened in two extremes - like a bumper crop of tomatoes in February planted at the base of a brick south facing wall in Tucson, to being able to get tomatoes, period, in the mountains - all by tricking mother nature.

At my sister's

Stan and us took a scenic drive to Apache Junction east of Phoenix for a friend's daughter's wedding. Since the southwest got lots of moisture this past winter we wanted to see the desert wildflowers - we caught the beginning of the season. And along the way we stopped at a copper mine overlook - Arizona is "The Copper State".

Sonora Desert beginning to bloom

Large Arizona copper mine


The next morning we dropped Stan at the Phoenix airport and met my brother and family for brunch. After visiting for a couple hours, we visited friends from our neck of the woods vacationing there. Visited for the afternoon, eating out on patio at Mexican restaurant for supper, then drove to Flagstaff to stay the night before heading home. We were going to visit some areas in eastern Utah, but since Colorado had gotten dumped on with snow, we figured it was probably chilly still with snow too.

Grand-daughter Scout


Then Easter weekend we visited our older son's. Emery and Scout were excited to see us!


Three year old wrote his name!

Monte and Emery having cookies and milk and a discussion


Remember I said Colorado got snow while we were gone? Yes, the entire state got snow. Our other son Dawson, with wife Sarah made snow "men?" And as I write this, it is snowing again!

Sarah and Dawson's snow creations
It's snowing today ... again!

March 31, 2013

Living as Easter People

"Body of Christ"- My needlefelted picture of a pruned grapevine framed by grape clusters hidden by leaves

 
“Love is not a duty it is our destiny. It is the language that Jesus spoke and we are called to speak it so that we can converse with him. It is the food that they eat in God’s new world, and we must acquire a taste for it here and now. It is the music God has written for all his creatures to sing and we are called to learn it and practice it now.”
- NT Wright, Surprised by Hope (and great book!)


A page from my sketch book drawn over thirty years ago


So how can we learn to live as wide-awake people, as Easter people? ... In particular if Lent is a time to give things up, Easter ought to be a time to take things up ... If Calvary means putting to death things in your life that need killing off if you are to flourish as a Christian and as a truly human being, then Easter should mean planting, watering, and training up things in your life (personal and corporate) that ought to be blossoming, filling the garden with color and perfume and in due course bearing fruit”
Ibid


A quick painting I did at a retreat about a decade ago


“Jesus is risen, therefore God’s new world has begun. Jesus is risen, therefore Israel and the world have been redeemed. Jesus is risen, therefore his followers have a new job to do. And what is that new job? To bring the life of heaven to birth in actual, physical earthly reality.”
Ibid

Wool seed pod and flower people I put out about the house every Spring - New Life!

March 13, 2013

Ukrainian / Pysanky Egg Dyeing

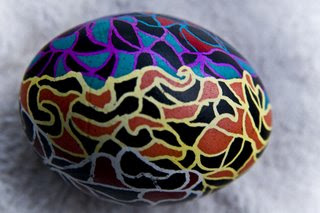
Ukrainian - Pysanky Eggs
It's that time of year again. Time to order dyes or kits, though I still have last year's dyes jarred in a box in the garage. When more people are going to be coming to our home to do eggs, I get some fresh dye, otherwise just use the stored dye. 

I saw an article in a 1973 National Geographic Magazine on Ukrainian eggs, and wanted to do them. Since I knew how to do Batik textile art, I understood the process, but didn't know special tools existed. As is typical of me, I just jump in and do things. I got beeswax and melted it in a metal measuring cup and stood over the stove painting the wax on eggs. And the only dyes I new of were the typical grocery store Paas (?- I think that's what it is) dyes. Monte joined in the process when we were dating.


Monte almost 40 years ago waxing an egg for resisting the dye - batik style egg designing

Years ago, group of young couples Travis brought to dye eggs
Soon after we were married I found the traditional kistka tools and special dyes. For years now we've been ordering supplies from the same store, and have bought kits for wedding presents. We've also bought a lot of extra tools and leave the dyes out for about a month and have had many people around our dining table decorating eggs. One couple, years ago so looked forward to it they started designing eggs months beforehand. When they moved away they bought their own kit and have done it every year.


Though electric kistkas exist, it's traditionally done by heating the metal funnel of the kistka over a candle till the beeswax is melted. It does not run out until it touches the egg. It's a wax-resist process, starting from lightest and getting progressively darker. You initially wax over everything you want white and put egg in yellow, once dry, you wax over what you want to stay yellow, and so on. When done you hold the egg to the side of the candle and wipe the melting wax off with a paper towel. The eggs are raw and they dry out over time.


Egg carton of our Ukrainian dyed eggs
This picture is just one of the three cartons that got done several years ago. That was a very productive and artistic weekend of eggs - Travis had several couples come and stay several days to dye eggs (and enjoy just hanging out, of coarse). Dawson has friends come too. Everyone loves it!

I cap the canning jars of dye and repack the box. I store them along with the old silver spoons, candles and candle-holders, box of tools, instructions and pictures, and then the vinyl tablecloth. It can be pulled out anytime. Every year I say I'm going to do it for Christmas ornaments - but I haven't yet.

Several years ago Monte made a shelf for the eggs to better display than the hanging wire baskets I've always kept them in. The company I order the dyes and tools from, the Ukrainian Gift Shop, has a variety of stands for the eggs. So I got a bunch of the cheap clear plastic stands. Monte is going to make a shelf unit for each of the kids too.


Having done these for years, I never varnished them and finally did a few years ago. It's a final step I've always skipped. So some of the varnished ones are older and already faded. These dyes are toxic, so no eating of the eggs, but are not run-proof, so make sure the varnish is not water-base. We nailed three nails every so often in boards to support the eggs and I use my gloved hands to rub the oil-base varnish on the eggs. (The stands could be used in the oven on low temp for helping melt the beeswax off. I've not tried this - but a book I have shows it.)

3-legged nail 'stands' for holding varnished dyed eggs
More people around our dining table Ukrainian egg dying

Dawson waxing his egg for dye resist

More people enjoying creativity and our home's hospitality

Shared with: The Homestead Barn Hop, The Chicken Chick

Related Posts Plugin for WordPress, Blogger...