Showing posts with label Soaked Foods. Show all posts

March 25, 2026

Kamut & Whole Wheat Sourdough Bread


Fresh baked sourdough loaves from fresh milled kamut and whole wheat flour I started two days ago. It was autolyzed (the grain flour soaked in the recipe's water). Then once the sourdough starter was added, it went through the folding process, and then was bulked a bit. Put into the cambro container, it was refrigerated (see that post from 2 days ago for the process). I did fold it a bit yesterday and shaped it into a nice boule, then back into the cambro and fridge. Today, straight from the fridge, it was baked! 

These are the containers I'm baking in. The long one is clay and the closest one is cast iron. They go into the oven to preheat to 500 degrees, so the pans get hot. 

I shape the cold dough on the counter and it sits while the oven and pans are preheating.

I typically do just one slash with a razor blade. 


Cambro

Once in the oven with the lids on, I turn the heat down to 450 degrees. Turn the timer on for 20 minutes. When it goes off, I remove the lids and have the timer go for another 20 minutes.  

 Because it is just the two of us I cut the cooled loaves in half and they store in the freezer. I have bread freezer bags I use for freezing the bread without plastic bags.

 I always have bread stored in a beeswax bag in our bread box in the kitchen. A breadboard sits near the bread box along with the sourdough knife. 

March 23, 2026

Fresh Milled Flour (FMF) From Many Grains!

I used to make bread, for almost 30 years with fresh ground flour - primarily hard white wheat. In one day I'd have 6 sandwich loaves, 4 french bread, and four dozen cinnamon rolls made. I'd freeze the majority of it all. That was when our kids were here. They were raised in this house, but now off raising their own families.
 
I started making sourdough bread. My research showed the nutritive value of sourdough, as well as its aid in digestion as a ferment. It's basically predigested.  It's also the way bread has been made forever. Yeast is new as of very late 1800, so from 1900 on our breads in the US have been made quickly and don't go through a ferment time using a starter culture. Anyway, I'm making everything sourdough from my almost 15 year old starter. I keep it in the refrigerator in between baking.
 
Fresh Milled Flours
 In the picture I've ground-
  • 600g Kamut
  • 200g Hard White Wheat 
  • 200g Hard Red Wheat   
     

Sourdough starter proofing in the oven

I've got it soaking in 800g warm water while my sourdough starter, which I added some flour and water to, is proofing in my Breville Smart Oven Pro. It almost always takes 2 hours to proof from the refrigerator to a bubbly state.
 

Soaking (autolyse) grain flour in the water

The soaking of the grain, in my third picture, is an Autolyze step I now do with all fresh ground whole grains. It softens the bran, primarily. I was told in the beginning of my sourdough process that you cannot use whole grain for sourdough bread because the bran would cut the bubbles and you'd end up with flat bread, so I used store bought (or Azure bought) bread flour, which are basically sifted for removing the bran (and probably the germ of the grain, which goes rancid, thus not shelf stable) and adding about 10-30% fresh ground flour. Because I made the Tartine sourdough bread for so many years, I really have the sourdough bread process memorized and great loaves of bread. I kept the freezer stocked for the two of us. 

 
I've got the bowl in above picture sitting on a heating source set at 80 degrees, while the starter is proofing in the oven, which is also set at 80 degrees. Our house is generally cold so a warmer temperature for proofing is good.
 
 Once the leaven is bubbly, I measure 150g of the leaven into the soaking ground grain. Then I let it autolyse some more. I usually wait about 30 minutes before adding another 50g of water and 25g of salt. 
  
 
Ready to mix in extra water and salt
Now, in this picture I'm ready to fold in the water and salt. I often just use my wet hands. I like to work the salt and water into the dough well. So I mix it in with lots of folds, almost like kneading.
 
Then about every 30 minutes with my wet hands I'll do several folds for about 2 hours. Most times I'm really good about this and sometimes very irregular. Then you're supposed to let it bulk rise for awhile. And again, sometimes I'm good at doing this and other times when busy I forget. But in the end, once folded several times and maybe bulked for awhile I put it in a Cambro container overnight in my fridge in the garage.
 
So stay tuned for the formed and baked bread, most likely tomorrow. Sometimes I'll keep it refrigerated for 2 days before baking if it fits my schedule better. I'll show you what I typically bake 2 loaves in, and then other pans I don's use as often. I'll give you a clue tho, I prefer bread easier to slice to eat with our fresh cooked chicken eggs, or sandwiches.


February 25, 2013

Soaked and Dried (Chocolate) Cereal

My pantry shelf with the jars of both plain healthy cereal and chocolate cereal


Some of this post is an older post, but I need to add the chocolate addition (since I was just eating some in my chia seed dairy kefir (did I do a post on that too? Hmmm . . .). I know I've mentioned somewhere about tweaking a chocolate cereal recipe. Monte requested it after having some chocolate granola from the store. My first try was with coco powder. It worked, but I wanted to experiment more. So, I've added some more pictures, and below I'll add what I now do . . .

Healthy 7 Grain soaked and dried Cereal
I've been making this cereal now for months. Everyone loves it - not only as a breakfast cold cereal, but it also makes a great snack. I'm now making it more often cuz I give it to both my sons. I mention it in an earlier post with source links to the health benefits of soaking grains. I'll be talking about these health reasons as well in a future post. That same earlier post also has recipes from my cookbook - how I made "cold" cereal before the knowledge of soaking grains.


You can use any flour. Since I've been grinding grains into flour for over 30 years, whenever I can get more grain varieties into our diet beyond basic wheat I go for it. So I make this cereal with a 7 grain mix I get in 25/50# bags.

When I had a lot of excess raw dairy milk by-products: whether plain soured milk, yogurt, or dairy kefir, that's what I made this with. Now I've narrowed our raw milk usage down to what we really like, and worth the extra cost and benefits of the raw dairy (I'll do a post about this). If I don't have enough dairy kefir, I buy a cultured buttermilk for making this cereal.

HEALTHY COLD CEREAL
1 quart cultured dairy (kefir, buttermilk, yogurt, or soured milk)
2 pounds flour
I weigh the flour now (for lots of things, especially sourdough) since amounts by cup vary depending on whether fresh ground or compacted over time. So cup-wise? Maybe around 8 cups.

Mix this together in a bowl to sit and soak for 24 hours.

The next day, after the 24 hour soak, mix in  -
1 C coconut oil (unrefined- organic virgin best)
1 C maple syrup (grade B is best)
1 1/2 tsp sea salt
3 tsps baking soda
1 1/2 tsp vanilla extract
1 Tb cinnamon


After mixing all together well spread in 2 baking pans. 9x13 would probably work; my 2 pans are 11x17. Bake at 350F for about 30 minutes, till a toothpick inserted in the center comes out clean. You don't want to over bake.

One pan of chocolate soaked cereal

When you want some chocolate cereal too, use the same recipe above. Put half in one pan, then mix into the other half one melted 4oz bar of 65-75% chocolate. Then spread that mixture into the second pan. Bake, crumble, and dry as stated.
 

Divide and crumble 'coffee cakes' for 9 dehydrator trays


Let these "coffee cakes" cool before crumbling into small pieces. You could dry this in a low temp oven at 200F, but you'll need lots of baking sheets to effectively dry. I dry mine in my dehydrator for about 12 hours.

I have ours in a glass canister for easy access and beauty! Try it, you'll like it!


Shared with: Granny's Vitals, My Cultured Palate, Simple Lives Thursday, Chicken Chick, Slightly Indulgent Tuesday, Fat Tuesday, A Better Mom, Hearth and Soul Hop, The Gathering Spot, Homestead Barn Hop, Nourishing Treasures, Traditional Tuesday

February 11, 2013

Sourdough Cheese Crackers

Sourdough Cheese Crackers ( my cracker tin, and then homemade mustard off to right)

We needed crackers again, so I pulled out my refrigerated Parisian Sourdough starter and started feeding it to activate it. I made the sausage cheese pie I posted about. I made crepes again since it was out, and I made some bread, then it'll go back into the fridge untill I want something else again. Like pulling it out in the evening and feeding it makes it usable the next day.

I have posted about crackers before. My cookbook has several cracker (as too, my "flake cereal") recipes - all prior to these days of soaking my ground flours with the wet ingredients for at least 8-12 hours before making the recipe - for better body assimilation.

Sourdough Cheese Crackers

1 cup sourdough
1/3 cup melted butter (or coconut oil)
1 1/2 cup whole grain flour

Mix this together till a not too sticky dough. Like start with 1 cup of flour and keep adding more till a pretty stiff dough and not too wet. It will absorb more of the flour as it sits, but I don't like it to be too sticky for my final mixing up and making.

Let this sit for at least 8 hours. I either do this in the morning to make in the afternoon, or mix it up at night to make the next morning. I think about oven usage. I like to turn the oven off once the baking time is done and leave the crackers in the oven overnight to let them dry out more.

Soaked dough flattened out and rest of ingredients sprinkle on


Flatten out dough on a silicone mat and sprinkle on -
1/4 tsp each: salt, onion and garlic powder
1/4 tsp baking soda
1/4 cup of grated cheese

Kneed this mixture together till seems well mixed. Divide the dough in half and roll out thin on two baking sheets. Score for cracker shapes. Bake at 350 degrees for 15 minutes. Then as I said, I turn the oven off and leave them in to cool and dry more.

Cracker dough rolled thin and scored


You could add any seasonings you desire. You don't need to add the cheese. I've used all varieties of cheese and like them all. This time I used Kerry Gold Irish Cheddar. I like gouda too. Blue cheeses are good, but can't eat so many of them - like it gets overpowering - maybe depends on what you want to serve them with.

Use as you do any cracker. I took some yesterday to a wine tasting we did with neighbors - they loved them! Homemade mustard is great on them. Use them for mini 'sandwiches'. I like making kefir cheese - straining off the whey - mixing it with salt, onion and garlic powder and balling it up and pouring good tasting olive oil over. It keeps well in cold storage for a LONG time. My balls don't stay together, but that doesn't matter - but the mixture spread on these crackers is awesome! Add a thin cucumber or any veggie slice and it's even better!


November 4, 2012

Feeding My Pets - Food Pets!

My Pantry


We've narrowed down our pets! Monte and me are empty nesters. When kids come home, they come home with more people, more family. But we've no longer got dogs to feed, cats to feed, rabbit to feed . . . I did get baby chicks last Spring, so I do now have chickens to feed, again. We built a new coop close to the house and they are my "girls" to visit daily - to get eggs. They don't need food and water nor coop maintenance but maybe twice a week, if need be.

My Chicken Coup


But I've taken on lots of" food pets" that need feeding! I saw this term in a bread book. I'm trying to re-find the exact phrase - it's probably in the Levain chapter. I've been known as the great bread maker. I wrote a book almost 20 years ago that people have been using for years - the bread making part having been very helpful. But I'm rarely making bread that way any more. I'm still trying to master the art of true sourdough bread (Monte and the boys have liked all my experimentation). I've had a successful rye sourdough starter for years and years, but it doesn't work for good bread - makes the best pancakes and great crepes. Sourdough starters are pets that have to be regularly fed. Luckily they can be refrigerated when not needing them.

My Ferments


I'm taking a hiatus from my fruit and veggie ferments. What's not in smaller jars in the fridge, I've put them in the cool cellar. We're still getting used to eating these, serving these. Need to remember to put a jar on the table and serve up little bits as a meal's side dish. Also seeing what we like best. They are great on sandwiches. I'm starting to use them lots in a wrap - whether a lettuce wrap, pita, crepe, or meat roll up. Once I've used up what I've got, I know I'll be making more kimchi this winter. Once cranberries start coming into the store big-time here soon, I'm doing a relish/chutney ferment (whichever you'd want to call it). I'll probably do a pineapple one soon too. And definitely a grated zucchini poblano chili one again very soon . . . LOVE! I'm putting these in my "pet" category, tho I don't have to truly be doing something with them much once they start their ferment, other than regularly checking on them and that they're submerged.

Vacuum sealed ferments ready to put in the cool cellar. I don't vacuum seal anymore (note at end).

My Dehydrator drying soaked nuts


And maybe too, soaking nuts before dehydrating, and soaking flours and concocting and drying cereals and things, are not truly pets. It's just that I'm doing them weekly and they take planning ahead and more messing-with-time. Like am I going to soak to sprout and then dry and grind into flour? Or soak flour and make the recipe? I've done posts on lots of this stuff if you look at my labels and read as to the health benefits.

Soaked and dried 'cold' cereal - still tweaking recipe for chocolate one - Monte wants it more chocolaty!


My Water Kefir with molasses and mineral drops


Every 48-60 hours I'm refeeding my water kefir and dairy kefir. I don't mess with second ferments on the water kefir as others do, like my son Travis. I primarily mix chia seeds and a pinch of stevia in the dairy kefir for eating with my morning fruit, shredded coconut, and soaked and dried cereal, and sometimes my soaked and dried nuts (eat them moreso later in the day as a snack). But I do have extra dairy kefir for salad dressing (I've finally got a favorite - cross between Ranch and Caeser - I'll post recipe sometime). I'll occasionally strain off the whey for use in ferments, using the very strained kefir as a cheese - either mixing with seasonings as a spread or even adding with virgin olive oil as a kind of shelf-storage way of preserving it.


Ginger Ale, Dairy Kefir, and Continual Brew Kombucha on heat mat (only in the Fall Fruit-Fly season does the kombucha need a rubber-banded cloth cover). NOTE:! I no longer brew all these close together - contamination! my kefir suffered the most!


Five days after I've replenished the strong sweetened black tea for my Kombucha, I start tapping off some from my continual brew crock, to taste. When the weather is hot, it's often ready to totally tap off, jar, and re-feed in five days, no matter it sits on a seed starting warming mat. In winter it brews longer - more like every 6-7 days. I taste for the between state of not too sweet and not too vinegary. I'll occasionally buy one at the store to see if I'm still up to par - SO expensive, when I'm making it for peanuts (where'd that phrase come from?). I don't mess much with second ferments of kombucha either - liking the original a lot. I jar up all that'll come out of the crock tap till it stops, then dump on top of the scoby the cooled room temp strong sweetened black tea - 1 1/2 gallons. So that's about what we drink each week of Kombucha.

Besides making wine, I've got a new brew I'm regularly making . . . Ginger Ale. Monte loves it with his meal! It's also good mixed with kombucha or water kefir. I'll do that recipe alone in a post rather than adding it to this one. And occasionally I make Beet Kvass.

Enough on my pets!

Note 10/20/2015: I did the vacuum sealing my first year. But ferments are alive and most of them popped the seal as they aged. I find just capping them well and storing in a fridge or cool cellar, they keep well - just make sure of submerged ingredients! Also, trying to vacuum seal will often pull out some of your brine - you want all your brine!


Linked to Kelly the Kitchen Kop, Simple Lives Thursday, My Cultured Palate, Beyond the Peel, Pickle Me Too, Whole New Mom, Fat Tuesday, Slightly Indulgent Tuesday, Dandelion House, Farm Girl Farm Fest, Fill Those Jars, Prairie Homestead Barnhop, Monday Mania, Melt In Your Mouth Mondays

September 2, 2012

Soaked and Dried Cereal

Healthy 7 Grain soaked and dried Cereal
I've been making this cereal now for months. Everyone loves it - not only as a breakfast cold cereal, but it also makes a great snack. I'm now making it more often cuz I give it to both my sons. I mention it in an earlier post with source links to the health benefits of soaking grains. I'll be talking about these health reasons as well in a future post. That same earlier post also has recipes from my cookbook - how I made "cold" cereal before the knowledge of soaking grains.


You can use any flour. Since I've been grinding grains into flour for over 30 years, whenever I can get more grain varieties into our diet beyond basic wheat I go for it. So I make this cereal with a 7 or 9 grain mix I get in 50# bags.

When I had a lot of excess raw dairy milk by-products: whether plain soured milk, yogurt, or dairy kefir, that's what I made this with. Now that I've narrowed our raw milk usage down to what we really like and worth the extra cost and benefits of the raw dairy (I'll do a post about this). If I don't have enough dairy kefir, I buy a cultured buttermilk for making this cereal.

HEALTHY COLD CEREAL
1 quart cultured dairy (kefir, buttermilk, yogurt, or soured milk)
2 pounds flour
I weigh the flour now (for lots of things, especially sourdough) since amounts by cup vary depending on whether fresh ground or compacted over time. So cup-wise? Maybe around 8 cups.

Mix this together in a bowl to sit and soak for 24 hours.

The next day, after the 24 hour soak, mix in  -
1 C coconut oil (unrefined- organic virgin best)
1 C maple syrup (grade B is best)
1 1/2 tsp sea salt
3 tsps baking soda
1 1/2 tsp vanilla extract
1 Tb cinnamon


After mixing all together well spread in 2 baking pans. 9x13 would probably work; my 2 pans are 11x17. Bake at 350F for about 30 minutes, till a toothpick inserted in the center comes out clean. You don't want to over bake.

Let these "coffee cakes" cool before crumbling into small pieces. You could dry this in a low temp oven at 200F, but you'll need lots of baking sheets to effectively dry. I dry mine in my dehydrator for about 12 hours.

I have ours in a glass canister for easy access and beauty! Try it, you'll like it!

March 19, 2012

Home Sweet Home

I was gone for two weeks - my daughter had her second baby - this time a girl - Bridget. What did I do the day I got home? I pulled out my Water Kefir grains and Sourdough starter from the fridge. Soaked nuts to dehydrate. Started the soaking process for Cold Cereal and Sourdough Crackers. And then got a batch begun for sourdough bread (which I'm going to have to post about). Those are now staples I always have on hand.

Bridget Lynn


February 25, 2012

Healthy Cold Cereal


Homemade cold cereal atop my homemade yogurt, unsweetened flaked coconut, and fruit


As I've said before, I've been reading in depth Sally Fallon's Nourishing Traditions book I've had for years, and now there's many gals writing blogs with recipes following her (The Weston Price Foundation) - Wise Traditions. This cereal recipe is from Sarah, The Healthy Home Economist. She tells you this is the only type of cold cereal you should be eating - get rid of all that processed boxed cereal!

My cookbook has some cereal recipes. I do them like crackers, rolling thin on cookie sheets, baking till crispy, and then breaking up in pieces. What I'd do differently with them now is soak the grain for at least 8 hours so it's healthier - easier to digest.

Oat and Barley flour mixed with yogurt to soak
This recipe soaks for 24 hours in yogurt - homemade yogurt of course. It's a keeper ... meaning we really like it. Next time I'm going to lesson the cinnamon amount and not use the maple flavoring. And I only used 1/2C of maple syrup. We're getting used to things not so sweet. And I'd like to taste the grain more. The freshly ground grain I made this from was oats and barley. Next time, Monte wants me to use the 7-grain mix. So again, as I've said before, you don't need to use wheat.


COLD BREAKFAST CEREAL
6 C freshly ground flour
3 C plain yogurt, kefir, buttermilk, or clabbered milk

Mix together in a large glass bowl. Cover with a clean cloth and rubber band and leave on the counter for 24 hours.

After soaking, mix the following into the batter -
3/4 C coconut or palm oil
3/4 C Grade B maple syrup(1/2C and 5 drops stevia may be substituted or honey)
1 tsp sea salt
2 tsp baking soda
1 tsp vanilla extract

1 tsp cinnamon

Mix all together and pour, spreading in 2 - 9x13 pans and bake at 350 for about 30 minutes until an inserted toothpick comes out clean (I used my 11x17 pans and baked about 20 minutes since thinner).

Let cool and crumble into small pieces (Sarah calls it "coffee cake" at this stage) and dry it at 200 degrees for about 12-18 hours (my dehydrator's highest temp is 155). Mine didn't take that long to get crispy.

The maple-cinnamon scent was sure strong throughout the house!

Store in airtight container in refrigerator. Mine is in a crock on the pantry shelf for now - it's disappearing fast!

FLAKE CEREAL (from my cookbook)
2C flour
(oat, barley, corn, buckwheat, rye, wheat ...)
1/2 tsp salt
2 Tb honey or molasses or maple syrup
1/2C milk

Combine. At this point, I rolled it thin on cookie sheets and baked at 350 for about 10-20 minutes till lightly browned. But now I'd suggest letting it soak at least 8 hours before rolling it out and baking. Crumble when cool and dry.

Eat these as you would your store-bought cold cereal and enjoy!

February 24, 2012

Sourdough Cheese or Plain Crackers


Rye Sourdough Cheese Crackers


I've been making homemade crackers for years. In fact I've got four recipes in my Hearth and Home cookbook I wrote seventeen years ago. Plain wheat thins and adding grated cheese have always been my favorite. I've often brought them places along with homemade mustard and/or a good cheese. The only thing I'd change now-adays would be soaking the flour in the liquid overnight, as the more I read the more I think that's the healthiest way to make anything with flour, unless you use sprouted grain flour. And as I wrote in my book ... think beyond wheat flour. We consume enough wheat in breads - everything else can be made from other grain flours. Our favorite crackers now are -


SOURDOUGH CHEESE CRACKERS

1C sourdough (click here for recipe)

1/3C melted butter or olive oil

1 1/4-1/2 flour

Mix this till a stiff dough, not too sticky, but tacky. Cover the bowl and let it soak for at least 8 hours.


When ready to make the crackers, preheat the oven to 350. I usually grease the counter with olive oil and my hands, then flatten the dough onto the counter. The hope, is to not be too sticky. If it is then you'll have to mix in some more flour till not too sticky. My sourdough is made with rye flour. When adding the flour I use a 7-grain flour. Once the dough is flattened on your counter, add -


1/4 tsp each salt, garlic, and onion powder (any seasoning you desire)

1/4 tsp baking soda


Knead to incorporate, then knead in

1/2C grated cheese


Divide in half and roll out thin to cookie sheet edges. Score, cutting into small squares - I have a fluted rolling tool, or you could use a pizza cutter. Bake 15 minutes. I often just turn the oven off at this point and leave them in the cooling oven. You want them to be crispy-done.


Any cheese can be used. We love flavored goudas - like smoked, or chipotle. Another favorite is with a garlic cotswold. I've even used a fancy cheese that had strips of stilton blue cheese - that was great too!


I have some old cracker tins I store them in. My other tin has crackers made from sprouted wheat flour, or was it flour soaked in yogurt ... I don't remember. Homemade crackers are so easy to make, why buy them!!!!


In case you don't have sourdough started and are dying to make crackers, here's my Wheat Thins recipe from my book -


3C whole wheat flour (any grain actually)

1/3C olive oil

1C water

1/2 tsp salt


Mix all the ingredients together. You could add other spices or herbs. Knead as little as possible till it makes a smooth ball. At this point I'd roll thin on ungreased baking sheets, cut into squares and bake at 350 for 30-35 minutes or until crisp. But now I'd let it sit covered for at least 8 hours before rolling out and baking. Sometimes, depending on your oven, if outer edges are getting too brown, remove them and return to baking.


February 7, 2012

Soaked and Dried Nuts and Breakfast Porridge


I've started soaking nuts this year. I've had Sally Fallon's Nourishing Traditions book for years and am just now getting around to reading all the great information - lots of it! - and doing more and more of it's recipes, believing it's philosophy.

BREAKFAST PORRIDGE

For any recipe utilizing grains, it's suggested to soak them for at least 8 hours. I've had a hand grain rolling machine for years and now have it set up in the pantry. The night before, if we're wanting to cook up a cereal for breakfast, we grind it and soak it. Monte's having fun picking different grains I have in jars in the pantry. His proportions are 1/3 C of rolled/cracked grain to 1 C water. You can add a pinch of salt if you like. Nuts could be added to this soaking mixture. Then in the morning gently bring it to simmering. Differing grains take differing times to soak up the liquid. Then we'll add fruit, unsweetened coconut, whey, and sprouted flax meal to it. And of coarse my homemade yogurt.


Soaking
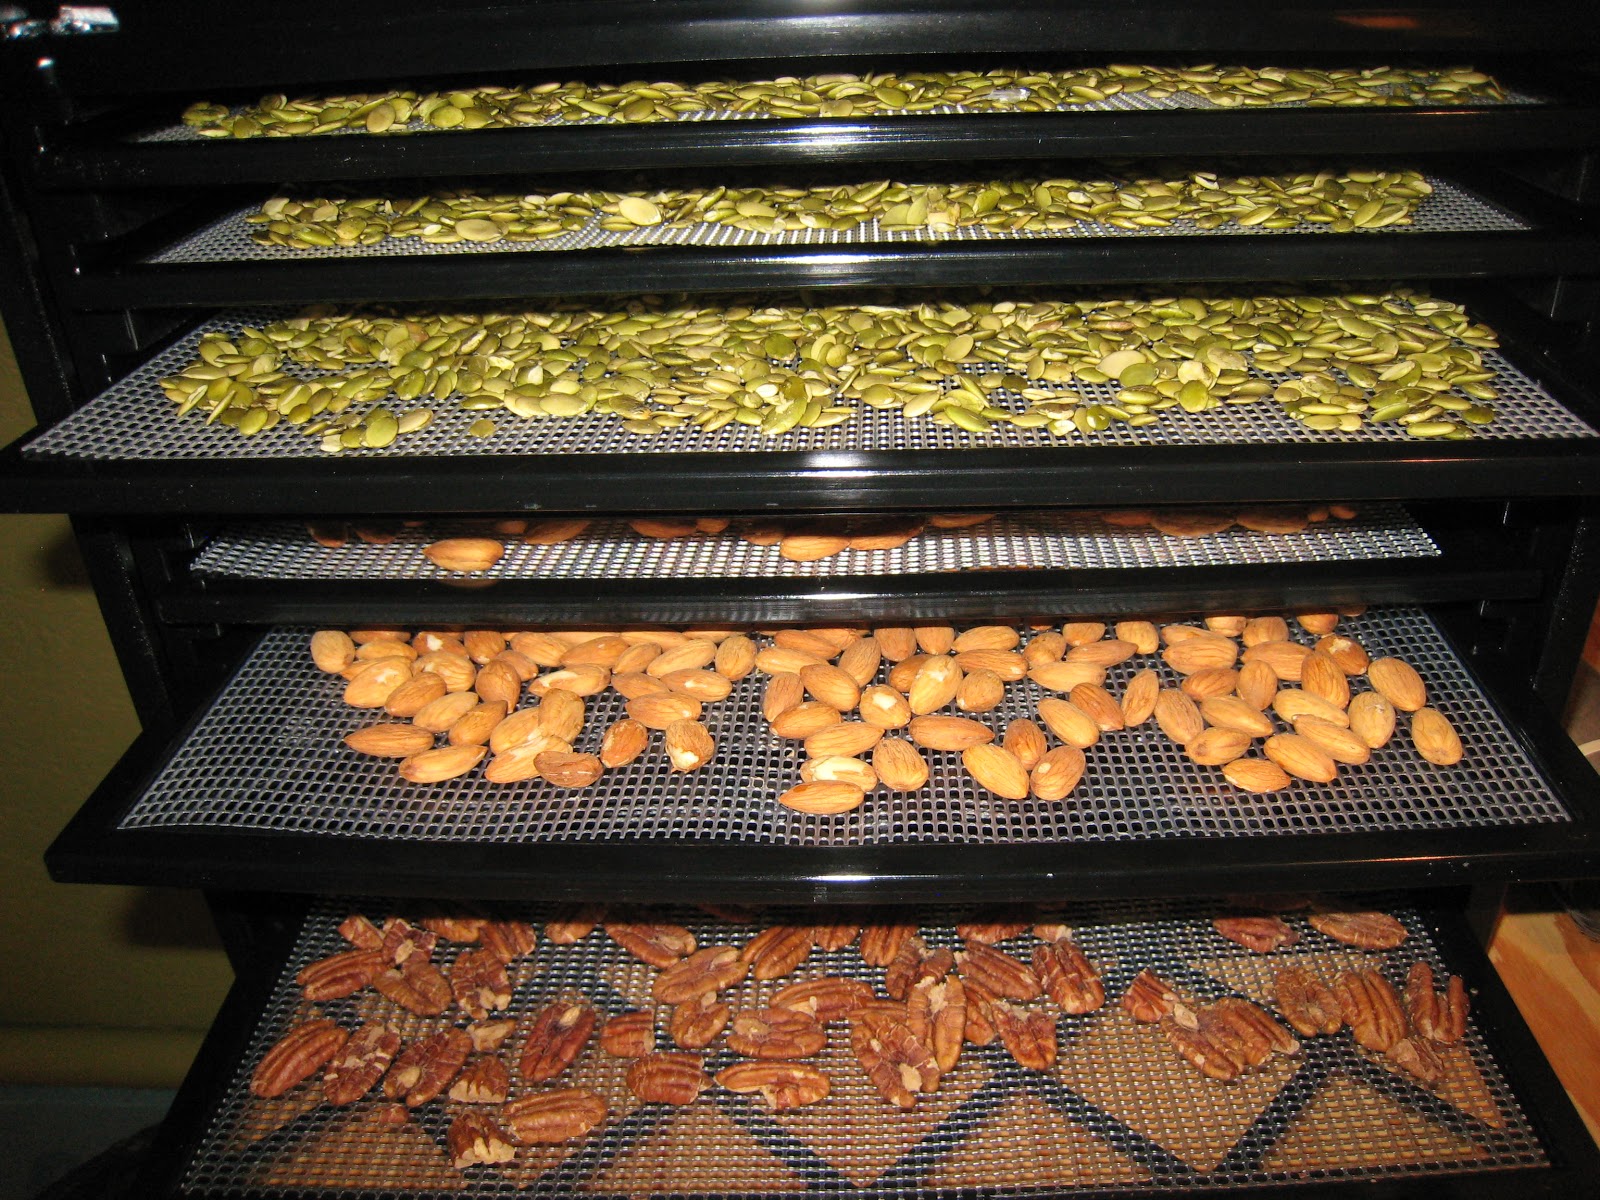
Why soak nuts? They contain enzyme inhibitors that can put a strain on the digestive system. Let them soak at least 7 hours or overnight (I prefer 12 hours - especially for the almonds). Drain. Spread to dry in either a warm oven (no more than 150 degrees) for 12-24 hours till dry and crisp; or dry in a dehydrator. My oven doesn't go that low, so the dehydrator is back in use.  Other than walnuts, that are susceptible to rancidity so should be stored in the refrigerator, all nuts can be stored in airtight container for months. They make great snacks!


SOAKED NUTS

4 C nuts
2 tsp sea salt
water to cover

Like I said, soak at least 7 hours or overnight, and then dry.

Crispy Pepitas (4 C raw soaked pumpkin seeds with 2 Tb sea salt, tsp of cayenne)
__________________________
Update - summer of 2012. I got an Excaliber dehydrator and am loving it.

Related Posts Plugin for WordPress, Blogger...