Showing posts with label Harvesting and the Pantry. Show all posts

November 7, 2015

Green Tomato Jam

Green Tomato Jam
This is now my second year to make Green Tomato Jam. If you grow tomatoes, at the end of the season you'll have green tomatoes. I'll leave the tomatoes for awhile, for some to turn red, but eventually you'll either toss them (compost or chickens), or like me, look for uses.

Typical recipes are for a pie - supposedly similar to apple pie. It's ok. But since we don't eat a lot of desserts, I want my desserts to be our favorites. Another is frying slices, which is good. I posted one recipe along with my end of season put-up of Zucchini Potato Soup, which tastes great defrosted for winter eating! This year I tried a green tomato relish (which I need to label in my fridge, cuz I recently pulled it out thinking it a tomatillo green salsa). It's ok too, but I haven't used it much. I'm going to try it as a sandwich spread, which could be good.

I found the recipe from Splendid Table. I used to listen to that NPR radio program every weekend till our station exchanged it with another program. Instead, I now get emailed weekly recipes and can listen to excerpts or podcasts. The recipe was actually in connection with another recipe - A Green Tomato Tart, which has a bottom ricotta and mascarpone (or cream cheese) layer. I did make the tart once, and will try it again, but typically just make the jam.

Green Tomato Jam

3# green tomatoes, cored and chopped (1/2" pieces)
2 2/3 cups sugar
2-3 lemons (2 zested)
1/8 tsp salt and scant 1/4 tsp pepper
4" cinnamon stick, broken

Hmmmm, now that I type this I realize I've never cored the tomatoes! and I've made quite a few batches. I will cut them in half and sometimes make a "V" for cutting out the stem end and that'll take out some of the white core. The other 1/2" piece thing I sometimes do, not an exact measurement, but realizing there's two end results depending on your preferences. Monte and some friends like the chunky jam. I could do with less chunks. This current batch I'm in process of making, I did literally hand cut yesterday (as I was needing to "fold" my sourdough bread dough every 30 minutes four times, and I was listening to an audiobook - so it was a relaxing time).
Chopped Green Tomatoes and Sugar sitting for 24 hours

Sometimes I use the food processor to chop them. Pulse them a bit and not too much, so you DO end up with some chunks.

The tomatoes and sugar need to be mixed together and sit for 24 hours. Lots of juice will be extracted.

Add the lemons. Zest the lemons and then cut off the white pith and chop. Two large lemons are enough - three if small to medium. Add the seasoning.

Bring to a boil, then simmer for about 40 minutes (210 degrees?). I don't take it's temperature. After awhile I'll get some jam juice on my spoon, let it cool a bit and slowly tilt back into the pot. When the drips start coming together slowly into one drop, it means it's thickened up about right. You don't want it runny. Remove cinnamon sticks.

Jar up and freeze. I haven't canned this up. My friend does. I do know, that if you leave it out, even in a cool cellar, it will develop mold. It holds up well in a refrigerator.

Now some of you are going to want the Tart recipe.

Tart Crust

1 cup (5oz) flour
2 oz almond meal
3 Tb sugar
3 oz (6 Tb) butter
1 large egg
1/8 tsp salt
1/4 tsp almond extract
1-3 Tb water
Mix together, cutting the butter and liquids into the dry ingredients. Chill. Roll out to fit a removable bottom tart pan. Bake at 375 with pie weights to keep crust from bubbling (I keep pie weights and a folded piece of foil in a container in my pantry) for 15 minutes; then 5-10 minutes without the weights. Cool. Then spread in -

Vanilla Ricotta Cream Filling

1/3 cup whipped cream or 1/2 cup mascarpone cheese (cream cheese, replacement)
3/4 cup ricotta
3 Tb sugar
1 1/2 tsp vanilla extract
Puree this together and Chill.

1 Hour before serving, spread the Ricotta mixture in the tart shell. Top with 1 3/4 - 2 cups Green Tomato Jam. Chill at least 40 minutes then 20 minutes outside the fridge. Serve.

I never took a picture of the finished tart! It was good. The base tart with ricotta filling (which I used cream cheese for only because I couldn't find mascarpone in the back of my cheese drawer, which I thought I had) would be good with any topping. Monte thought layering on some thin slices of pear, which we had excess of at the time, would be good.

I gave the jam as Christmas presents last year along with home brewed Vanilla Extract.

March 1, 2013

Making Maple Syrup

I just read a letter about New Englanders readying their equipment for maple syrup season. It reminded me of long ago when we helped Monte's dad make maple syrup in Wisconsin. We didn't do it a lot cuz it's impossible to plan "vacation time" when you never know when the sap will start running.

Tho Monte's cousins have established modern ways of maple syrup making and creating businesses, Monte's dad did it the old fashioned way. He hung buckets on the trees, rather than having hoses run to holding tanks in sheds. Riding the 4-wheeler thru-out the day and night to collect full buckets AND to keep the fire stoked under the large flat boiler pan, was work. It was all done out in the open and not a shed with stove burners. He wasn't doing it for a business, just enough for the family. Emery grew up on a homestead there and maple syrup was their main sweetener, so he'd gotten a bit sick of it. But moving back to the homestead and having Grandkids (and a curious wife of his son - ME) ask about the old day experiences kinda made him want to do it again.

Did you know it takes 40 gallons of sap to cook down to 1 gallon of syrup? The taste of the cold sap with a hint of maple flavor is very good and refreshing. And if you've read Laura Ingals Wilder books you'll know there's something called "sugar snow". It's an extra surge of sap run after the season is basically over - just a bit of freeze and thaw. They'd celebrate by making syrup from it and eating it over snow like a snow-cone.

I'm going to post a string of old photos from our experience.

Travis straining sap into old milk cans in the 4-wheeler

Travis and sap in milk cans on 4-wheeler

Grandpa talking to Travis

Collecting maple tree sap

Grandpa Emery and Heather riding the 4-wheeler

Me with Travis collecting sap from tapped maple trees

Monte's dad - Grandpa Emery

Heather with tree sap collecting pail

Travis by the boiling area checking on the fire

Grandpa Emery, little Dawson, and Travis boiling down the maple sap for syrup


Memories? The brisk out-of-doors with no mosquitoes, tics, or black flies; identifying tracks of animals in the mud; beaver coming out of dens on the breaking up ice ponds; wood smoke; pancakes with fresh syrup . . .

We don't have hard maples in Colorado. We still have some jars left, tho it's been years, that we're saving . . . Not sure for what . . . But it reminds us . . .


Shared with: Real Food Wednesday, Simple Lives Thursday

February 11, 2013

Blender Impossible Squash Pie

Blender Impossible Squash Pie
I have this recipe in my cookbook. One day we sat down with some of our grown kids, talking thru my cookbook I wrote 20 years ago. They'd make comments like, "I hated that" or "we do this this way now". Travis's comment about this recipe was, "I never liked pumpkin pie, but this recipe helped me like it. I love this pie, and it's even good leftover cold!"

I grow winter squash. It's a great feat at my mountain altitude to get winter squash, and have an abundance of it stored in the garage. So I have to remember to keep pulling it out to bake each week. This is a recipe I often do with the leftovers. And I don't really bother measuring the squash - like I probably have more than the called for 1 cup.

Back in the day, I was using powdered milk a lot. So my book's recipe has 1 cup water and then 1/3 cup milk powder. Now I'm using raw milk and will even add in some extra cream when I've got extra. And use whatever type of flour you want - I tried almond meal this time and it worked fine. The original versions for these impossible pies used Bisquick, and I came up with this version instead. Occasionally I'll use my extra sourdough I need to be using when building up for bread-making. Use any kind of squash (excepting stringy spaghetti squash).

Blender Impossible Squash Pie

1 cup milk
1+ cup of cooked squash
4 eggs
1/2 cup flour
1/3 cup honey (I'll occasionally use maple syrup)
1 tsp allspice
1 tsp cinnamon

Combine all in the blender and blend. Pour into greased and floured pie dish. Bake at 350 degrees for about 1 hour, or till toothpick or knife comes out clean.

December 31, 2012

Cooking Grass-Fed Beef/ Meats

Elk jumping our fence - what we've eaten for over 20 years
We bought part of a cow. Because of last years heat and drought many farmers, including our raw milk dairy, have had/ are having to butcher more animals due to lack of feed or excessive feed costs. Like our dairy, in over 100 years of farming, this is the first year they've had to buy feed, bringing it in from Canada. As a result, they've invested in hydroponic growing of grains like barley. Not many out there doing it, so few to talk with and learn from.

Grass-fed beef is another animal! I tried grilling a rib-eye steak as I'd occasionally do with typical beef . . . Boy was that tough! and I'd not even cooked it well-done. For twenty years our main meat source was elk along with some venison. Now THAT is grass-fed meat. Grass-fed meats are higher in omega-3 fatty acids.

In grass-fed meat animals there's no marbling of fat. The "inter-muscular fat", acts as an insulator during the cooking process helping to keep natural meat juices from cooking away. There's no fat to absorb the heat. It will therefore cook faster, like 30% less time, than regularly processed meat, and is easily overcooked, especially when using the dry heat method of cooking. Moist heat cooking is the easy way to cook meat - pretty forgiving. Searing the meat for dry heat cooking is a must, to help hold in juices. Cooking at lower temps is best too.

Another technique we've found for quality cuts of meat that I'd want to quick cook is marinating it overnight, or aging it in the fridge a few days. Choose marinating ingredients that won't mask the wonderful beef flavor! Like your favorite Italian salad dressing is a good marinade. Lemon juice, wine, beer and vinegar work.

Slow cooking is the best. Once it's defrosted (not in the microwave which further dries it out) put 1/2" of liquid (water, wine, broth ...) in a crock pot or covered oven roast pan, put in the meat and season. Cook on low for 7 hours or 325 degree oven (or slow-cooker high for 3 hours or 375 degree oven), then add veggies and cook another hour to roast them.


The front of the animal is the tastiest meat, but definitely needs the slow moist heat method. Hamburgers from grinding the chuck are the best! The back of the animal is leaner and in grass-fed animals really needs extra care in cooking.

December 30, 2012

Fermented Onions and More

Fermenting Veggies, Red Onions, Cranberry Relish, Beets, and Pear sauce for dehydrating as a 'leather'


Did more ferments. I LOVE the veggie mixture for putting on a platter with some homemade dips. The first time I tried this was for Thanksgiving - only fermenting them a couple days. I thought they'd get soggy over time, but they don't. The ones I jarred up in smaller jars and put in my cold cellar are still crispy nice . . . And such wonderful flavor! So I did it again for the Holiday get-togethers, which always need more wholesome veggies available! as well as that taste variance over all the sweets (which I don't eat much of tho they are around).

I already posted about the Cranberry-Orange-Apple Relish. This is my third batch this season, and will probably do more till no more fresh cranberries are in the store. I mostly use it mornings with my dairy kefir or homemade yogurt, soaked and dried walnuts, shredded coconut, and sometimes adding a bit of my soaked and dried cold cereal (all recipes posted here).

I love beets and decided to keep making this version - sliced beets - over the kvass recipes. I still drink the brine. And I'm really excited about the red onions. I'm going to be adding them to all sorts of things. Like on salads, in egg and chicken salads, sandwiches . . . I do use whey in most of my ferments. I've read of using other starters or none at all. I have access to liquid whey whenever I want it. It's very nutritious, and I've not found any undesirable texture or taste! And I've not made an official brine either. I typically put all the ingredients in a large bowl and sprinkle on the salt I'd use if making a brine and keep stirring and tossing, to start the process before jarring up in my Pickl-It jars, and adding the water amount to cover.

Monte just mixed up some special canned tuna I got from I Love Blue Sea (and will keep getting cases from them - it's THE best!) with my cultured homemade mayo and the fermented zucchini with poblano chilies I kept making at the end of summer - serving it with my homemade sourdough gouda cheese crackers. SO GOOD!

November 30, 2012

Cultured Cranberry Relish and Veggie Dippers

Fermenting veggies for serving with a dip, and cranberry relish - for Thanksgiving Day


I posted earlier about wanting to ferment my typical raw cranberry relish I make for Thanksgiving. And I said I wanted to ferment the veggies for a platter with a dip. I put off fermenting them cuz I was afraid of them getting too fermented. Like would the veggies be soggy limp? So I fermented them for about 24hours. They were a hit!

WELL . . . I had two jars of each. So a week later I jarred them up to put in my cool cellar. The veggies were still delish with a crunch and the cranberry was great too.

I just bought more organic cranberries that were on sale and going to make up some more. I'll probably keep doing this till the cranberry season is done. Is that just after Christmas?

I bought organic broccoli, orange cauliflower, celery, cucumber and carrots. I sliced them and put them in a large bowl, along with some slivered fresh garlic. I sprinkled on about 4 Tb sea salt and occasionally stirred to start the veggies juicing. I must have wrote this down somewhere! cuz I'm pretty sure I added some peppercorns and possibly some cloves. And then some liquid whey. Just make sure the veggies are covered with water, which with the salt becomes a brine. There's a glass weight in the jars to keep the veggies submerged.

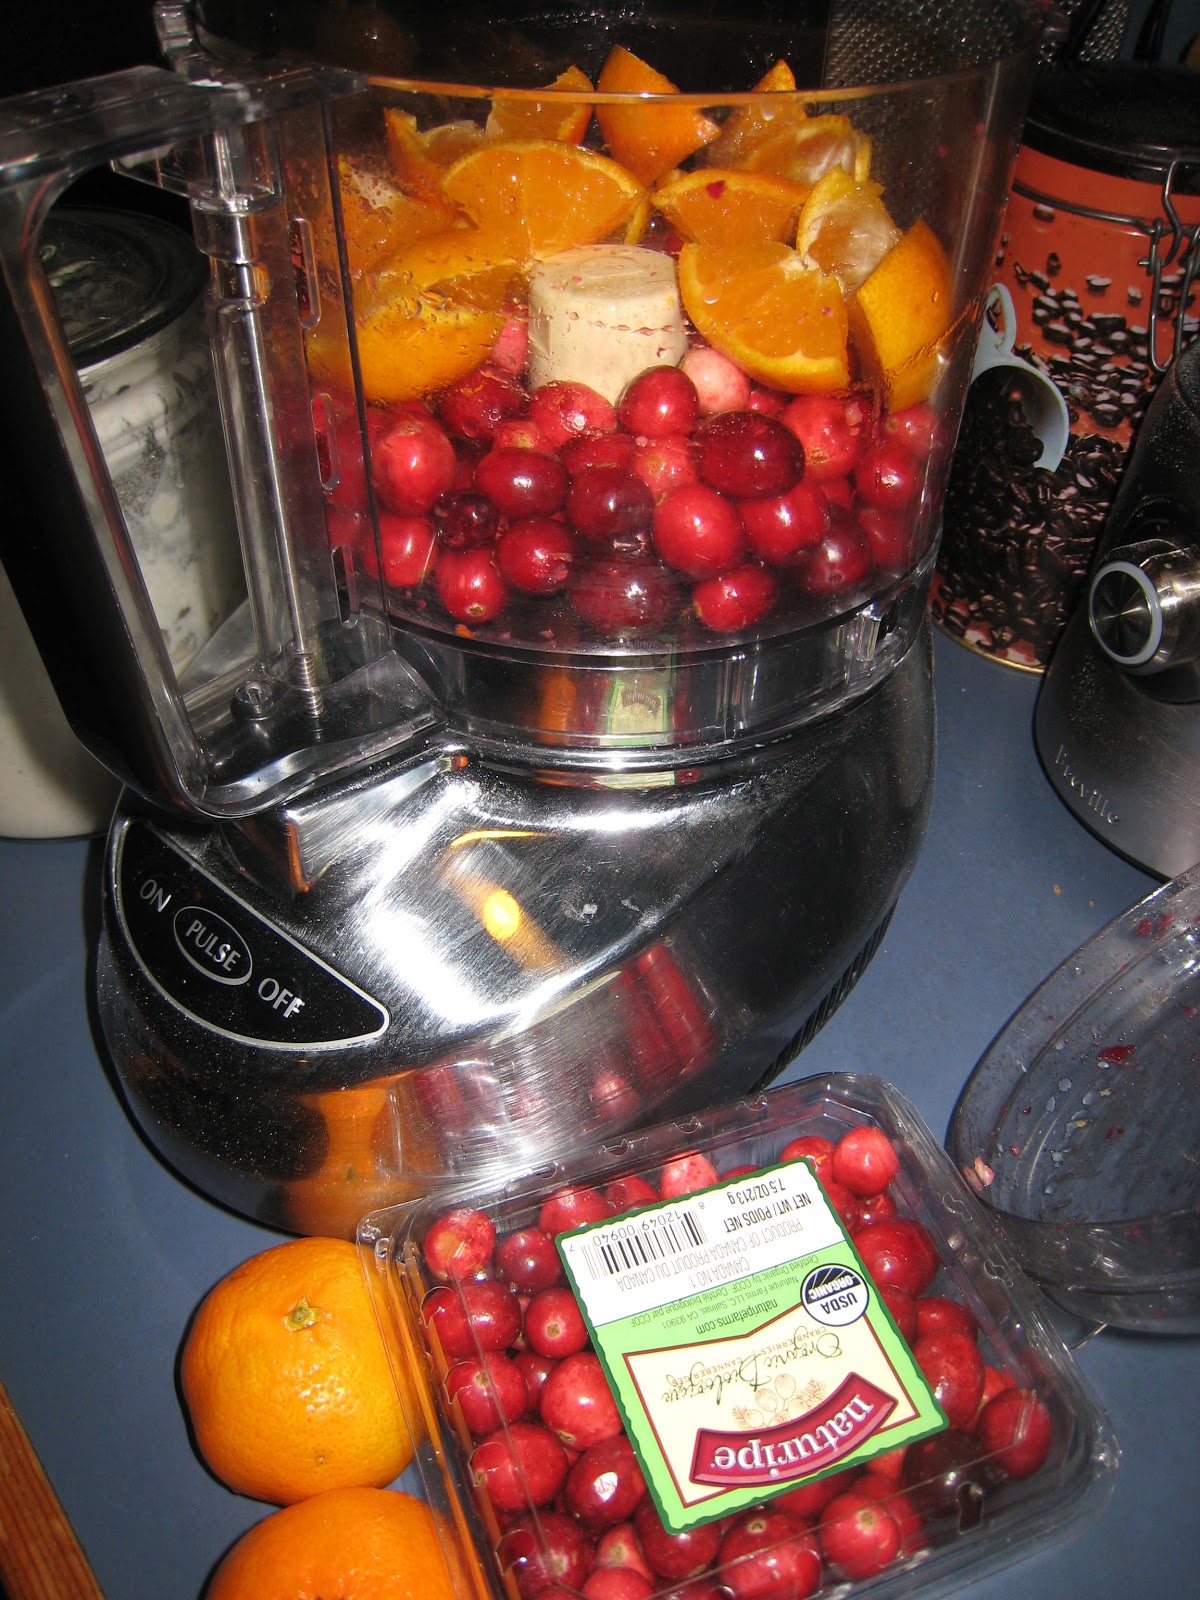
Pulsing cranberry relish ingredients
CRANBERRY ORANGE APPLE RELISH

4 - 7.5oz containers of cranberries (about 8 cups)
8 tangelo type oranges, skin and all (remove seeds!)
3 apples
1/2 cup sucanat
2 tsp cinnamon
2 tsp salt
1/2 cup raisins
1/3 cup whey
1/2-1 lemon

Pulse all but the whey in a food processor. Don't puree. This mixture filled my 1 1/2 Liter and a 1 Liter Pickle-It containers, with a glass weight, and airlock on top of jar. I squeezed some lemon juice on top of both for extra submerging liquid. You can do this in a regular fido jar or canning jar with a plastic lid. But I have tasted a difference in the foods fermented with the airlocks - better tasting!

Sharing at: Simple Lives Thursday, My Cultured Palate, Beyond the Peel, Real Food Wednesday, Fat Tuesday, Slightly Indulgent Tuesday, Pickle Me TooMonday Mania, Prairie Homestead Barn Hop, Farm Girl Blog Fest, Dandelion House, Food Renegade

November 19, 2012

Cultured Condiments

Homemade Cultured (fermented) Condiments


I was wanting to make egg salad (recipe under eggs label - thee best!) and realized I needed more mayo. I make mayo. I'll keep some store-bought around ... for some people ... but I prefer homemade.

Since reading Sally Fallon's Nourishing Traditions (have I read it all? has anyone read it all? what a resource!!!!!!!) I started making my own ketchup and mayo. I'd been making my own mayo occasionally, and mustard for years, but now culture it. By letting them ferment a bit with the addition of liquid whey (draining the liquid from my homemade yogurt or dairy kefir) their nutrients are boosted with more enzymes and vitamins (and dare I say 'organisms'? - like probiotic) and it helps preserve them for a long time.


MAYONNAISE
Have all the ingredients at room temp.

3 egg yolks or 1 whole egg and 1 yolk
Definitely use washed organic eggs, or better yet, pastured eggs.
I use my own chickens eggs which are fed organic non-GMO grains.
1 tsp dijon mustard (my homemade!)
1 1/2 Tb raw apple cider vinegar or lemon juice
1 Tb whey (not powdered)
1/2 tsp sea salt
1 cup extra virgin olive oil

Making mayo in a food processor
Combine all but the oil in either a blender or food processor. With it running, slowly drizzle in the olive oil and the mixture will thicken. Jar up and leave the jar with the lid on, on the counter for 7 to 12 hours to culture, and then refrigerate. This keeps for many weeks!

I love the flavor of extra virgin olive oil. If you don't, experiment with other oils. You can find all kinds of suggestions online. Unless you buy organic mayo, you are getting GMO soybean oil, etc.

For ketchup I use tomato paste and the vinegar and whey and spicing. There's lots of recipes out there. I use Sally's. And same goes for mustard. For years I've been using a mixture of dark brown and light golden mustard seeds.

Homemade mustard is fabulous. I'll often take it to gatherings, along with some cheese and homemade sourdough crackers (I've got cracker recipes posted).

I like mixing some mayo and ketchup together, equal proportions, for a quick kind of Thousand Island salad dressing.

November 17, 2012

Greenhouse Gardening

View of herb bed looking at greenhouse outside inside greenhouse windows ;^)


Monte and me designed a new greenhouse outside the south windows of my indoor greenhouse. Confused? Off our dining room is a greenhouse. Instead of going directly outside out the back door, you first walk thru a greenhouse, then out another door to our Pergola (which is this blog header pic).

For years, in the summer, on the outside south facing windows of the greenhouse, we've planted tomatoes. At 8000 feet elevation we have about 90 days of frost free growing period, and many nights go down to 55 degrees or less. All this does not bode well for growing tomatoes. Like the book title $64 Tomato (fun book), every year I wonder why I even take the time to grow tomatoes! Tomato plants, all summer-long in walls-of-water, is about my only way. Tho now my son made me a rock spiral bed and the rocks warm the soil quite nicely for tomatoes, in which I grow 60-days-to-maturity determinate tomatoes.

Outside greenhouse has 4 doors that can open and an automatic arm opener for the little above window


We bought a roll of greenhouse plastic and stapled it both inside and outside of our greenhouse frame - hoping for more insulation. Monte made doors to access the inside growing space. From past experience of putting plastic over the bed at the end of the summer, we knew it 'cooks' inside. So I researched and bought a window that has an automatic arm opener - no electricity. Pretty snazzy!

Automatic arm opener to release excess heat
I've got some lettucy transplants and herbs in there, and seeds started for more, as well as radishes. Roof water can water it when available. Last year I did something like this but not very accessible, so let it do it's own thing, till come February we noticed fairly large lettuce growing, so then we made it easier to get into and didn't have to buy lettucy salad makings (nor snap peas) till . . . this fall - between it and the summer planted outside gardens.


Kale, Chard, Spinach, Lettuce varieties, Herbs and radishes inside outside greenhouse.


Thompson Seedless grape clusters inside greenhouse


My 'inside' greenhouse still has grape clusters hanging down. We already harvested a bunch of clusters - freezing them in ziplock bags. We're leaving these to eat and dry. We've found it's fun to just go and eat the hanging "raisins". Guests love it!


Old glass window cold frame


A past winter we tried a simple cold frame. It worked great . . . till the voles found it about late February. We strung lights thru it to heat it some. I think water jugs would heat a cold frame too, tho taking up space. But if you're not around to crack open the window frames it can get quite hot in there on sunny days pretty much 'cooking' the veggies!

Nice winter harvest from cold frame


I've tried growing salady things in my inside greenhouse over winter and have decided it's too labor intensive to water and not worth it. I do keep herbs and my large potted plants for outside summer deck decor overwinter in the greenhouse. Some year I might try hydroponic growing in there. I've got heat coils and grow lights. What I do use it for primarily tho is my early seed starts for planting outside in the spring - which I begin in January-February. With my short cool growing season it's how I get a head start. Like I start broccoli, cauliflower, cabbage, chinese cabbage, leeks, flowers . . .


My inside greenhouse right now
Spring plantings in the greenhouse

November 4, 2012

Feeding My Pets - Food Pets!

My Pantry


We've narrowed down our pets! Monte and me are empty nesters. When kids come home, they come home with more people, more family. But we've no longer got dogs to feed, cats to feed, rabbit to feed . . . I did get baby chicks last Spring, so I do now have chickens to feed, again. We built a new coop close to the house and they are my "girls" to visit daily - to get eggs. They don't need food and water nor coop maintenance but maybe twice a week, if need be.

My Chicken Coup


But I've taken on lots of" food pets" that need feeding! I saw this term in a bread book. I'm trying to re-find the exact phrase - it's probably in the Levain chapter. I've been known as the great bread maker. I wrote a book almost 20 years ago that people have been using for years - the bread making part having been very helpful. But I'm rarely making bread that way any more. I'm still trying to master the art of true sourdough bread (Monte and the boys have liked all my experimentation). I've had a successful rye sourdough starter for years and years, but it doesn't work for good bread - makes the best pancakes and great crepes. Sourdough starters are pets that have to be regularly fed. Luckily they can be refrigerated when not needing them.

My Ferments


I'm taking a hiatus from my fruit and veggie ferments. What's not in smaller jars in the fridge, I've put them in the cool cellar. We're still getting used to eating these, serving these. Need to remember to put a jar on the table and serve up little bits as a meal's side dish. Also seeing what we like best. They are great on sandwiches. I'm starting to use them lots in a wrap - whether a lettuce wrap, pita, crepe, or meat roll up. Once I've used up what I've got, I know I'll be making more kimchi this winter. Once cranberries start coming into the store big-time here soon, I'm doing a relish/chutney ferment (whichever you'd want to call it). I'll probably do a pineapple one soon too. And definitely a grated zucchini poblano chili one again very soon . . . LOVE! I'm putting these in my "pet" category, tho I don't have to truly be doing something with them much once they start their ferment, other than regularly checking on them and that they're submerged.

Vacuum sealed ferments ready to put in the cool cellar. I don't vacuum seal anymore (note at end).

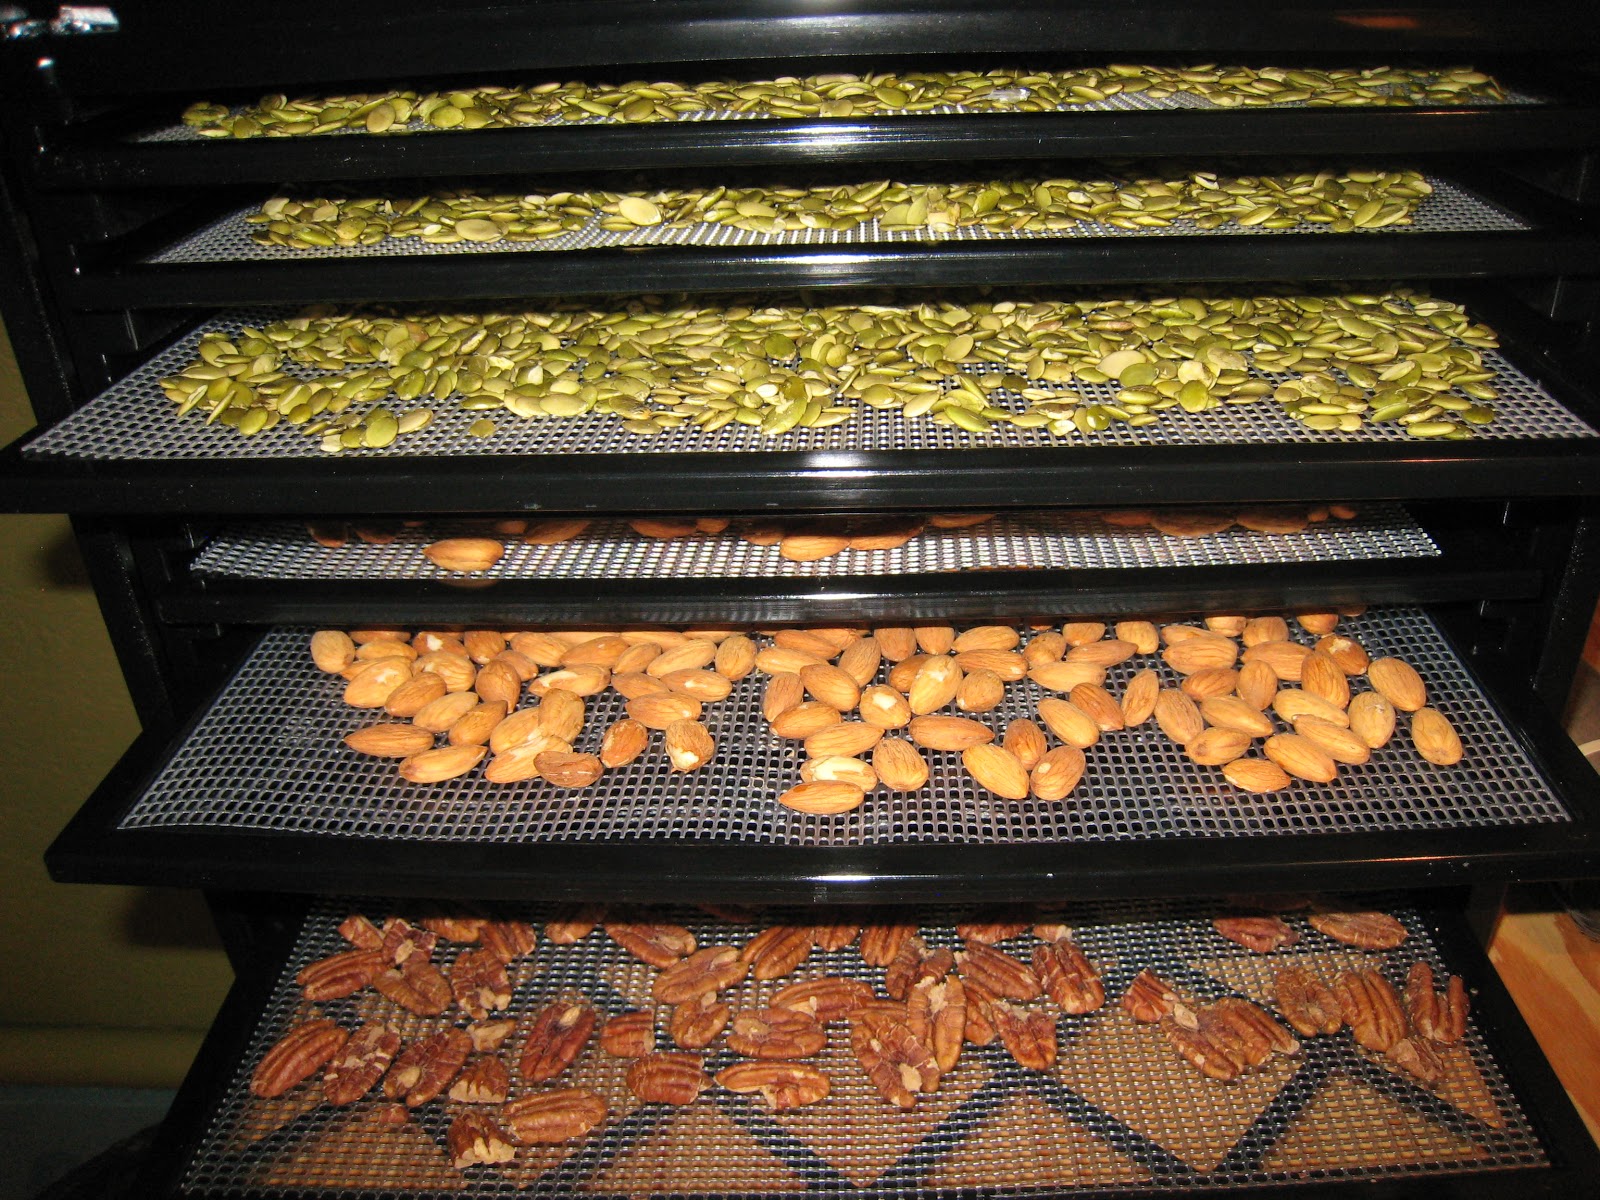
My Dehydrator drying soaked nuts


And maybe too, soaking nuts before dehydrating, and soaking flours and concocting and drying cereals and things, are not truly pets. It's just that I'm doing them weekly and they take planning ahead and more messing-with-time. Like am I going to soak to sprout and then dry and grind into flour? Or soak flour and make the recipe? I've done posts on lots of this stuff if you look at my labels and read as to the health benefits.

Soaked and dried 'cold' cereal - still tweaking recipe for chocolate one - Monte wants it more chocolaty!


My Water Kefir with molasses and mineral drops


Every 48-60 hours I'm refeeding my water kefir and dairy kefir. I don't mess with second ferments on the water kefir as others do, like my son Travis. I primarily mix chia seeds and a pinch of stevia in the dairy kefir for eating with my morning fruit, shredded coconut, and soaked and dried cereal, and sometimes my soaked and dried nuts (eat them moreso later in the day as a snack). But I do have extra dairy kefir for salad dressing (I've finally got a favorite - cross between Ranch and Caeser - I'll post recipe sometime). I'll occasionally strain off the whey for use in ferments, using the very strained kefir as a cheese - either mixing with seasonings as a spread or even adding with virgin olive oil as a kind of shelf-storage way of preserving it.


Ginger Ale, Dairy Kefir, and Continual Brew Kombucha on heat mat (only in the Fall Fruit-Fly season does the kombucha need a rubber-banded cloth cover). NOTE:! I no longer brew all these close together - contamination! my kefir suffered the most!


Five days after I've replenished the strong sweetened black tea for my Kombucha, I start tapping off some from my continual brew crock, to taste. When the weather is hot, it's often ready to totally tap off, jar, and re-feed in five days, no matter it sits on a seed starting warming mat. In winter it brews longer - more like every 6-7 days. I taste for the between state of not too sweet and not too vinegary. I'll occasionally buy one at the store to see if I'm still up to par - SO expensive, when I'm making it for peanuts (where'd that phrase come from?). I don't mess much with second ferments of kombucha either - liking the original a lot. I jar up all that'll come out of the crock tap till it stops, then dump on top of the scoby the cooled room temp strong sweetened black tea - 1 1/2 gallons. So that's about what we drink each week of Kombucha.

Besides making wine, I've got a new brew I'm regularly making . . . Ginger Ale. Monte loves it with his meal! It's also good mixed with kombucha or water kefir. I'll do that recipe alone in a post rather than adding it to this one. And occasionally I make Beet Kvass.

Enough on my pets!

Note 10/20/2015: I did the vacuum sealing my first year. But ferments are alive and most of them popped the seal as they aged. I find just capping them well and storing in a fridge or cool cellar, they keep well - just make sure of submerged ingredients! Also, trying to vacuum seal will often pull out some of your brine - you want all your brine!


Linked to Kelly the Kitchen Kop, Simple Lives Thursday, My Cultured Palate, Beyond the Peel, Pickle Me Too, Whole New Mom, Fat Tuesday, Slightly Indulgent Tuesday, Dandelion House, Farm Girl Farm Fest, Fill Those Jars, Prairie Homestead Barnhop, Monday Mania, Melt In Your Mouth Mondays

September 2, 2012

Ferments

Beautiful! Fermenting veggies in Pickl-It jars


Earlier ferments - Bing Cherry Chutney on the left

I'm having a blast learning to ferment foods. I can't take the time to tell you all the reasons why fermented foods are so important in our diet. If you google the subject you'll find tons of articles about it. I will post about the whys eventually. For now, I'm just excited to share pictures of my stuff. It's so pretty ... and tasty. All I'll say for now is that it's a very old traditional process in all cultures around the world. Our modern pickling with vinegar, as well as our modern preservation with canning, is not traditionally old-style - and not as healthy.

From left to right in the top photo is: beet kvass, spicy grated zucchini, dilly green beans, garlic sauerkraut using 1/2 red cabbage (on my second batch), the best fresh salsa (on my second batch), turnips and beets, kimchi (a second batch too and my favorite!). The first's of the above are in the cellar (excepting the salsa which we've consumed) along with a rhubarb chutney. These fruit chutneys are not sweet but savory.

Finished ferments vacuum sealed to go into cold storage
I'll post more details later. We finished off our root/wine cellar better this summer, so that is the "cold storage" where I'm putting these rejarred and vacuum sealed finished ferments. I'll take pictures of the cellar soon and post.

The quart jars to the right in the last picture are cultured dairy I strained for it's whey, then squashed into balls and are covered with virgin olive oil. The balls did not stay intact, but it's preserved and tastes so good added to salads or spread on artisan bread.

Use of all these things is what I also want to post about. It's all fine and fun to dehydrate, freeze, and ferment stuff ... but you've got to use them!

Current Note (10/20/2015): It's 3 years later. What do I still like? Or moreso, what do we find ourselves actually still using and eating?! I find I can only eat so much, and so much variety is overwhelming! Sauerkraut is number 1, and easiest and most liked to eat. I do really like kimchi, but still, not in the habit of eating it. I have very few recipes using the preserved lemons, but they are SO good, and seem to last well, so I don't make much. The fruit ferments we don't really like, excepting the cranberry one I've done other posts on. It keeps really well too. I typically freeze green beans, but as a ferment, the dilly beans are good. And whenever I'm going to do a veggie tray for gatherings, I'll start them with brine and spices, a few days before - I've posted on this too. And last, but not least, I prefer brined cucumber pickles to typical vinegar processed pickles! They keep well too - a little foggy brine as they age hurts nothing and is the norm. A friend has told me I really need to be making my own Apple Cider Vinegar. "So easy," she says. I do use it all the time - especially in my homemade salad dressings, which we eat a lot! We'll see. Our little local natural grocery store we go to regularly is carrying more and more ferments, so I'll occasionally try variety that way. Like I really like a green chile pepper spread on sandwiches . . .

Shared this post at: Monday Mania, Homestead Barn Hop, Delicious Obsessions, Pickle Me Too, Cooking Traditional Foods,

August 27, 2012

Basil Pesto and Potato Chicken Recipes

I've made pesto for years and frozen it. All these years I've made it with pine nuts, and then freeze without the parmesan cheese - adding it as I use the pesto. Now I'm going to be making it with my soaked and dried walnuts instead of the pine nuts. And I'm not going to add the nuts when freezing, adding them as well as the parmesan when using. I'll occasionally still use pine nuts, but I'm liking the walnut variety better.

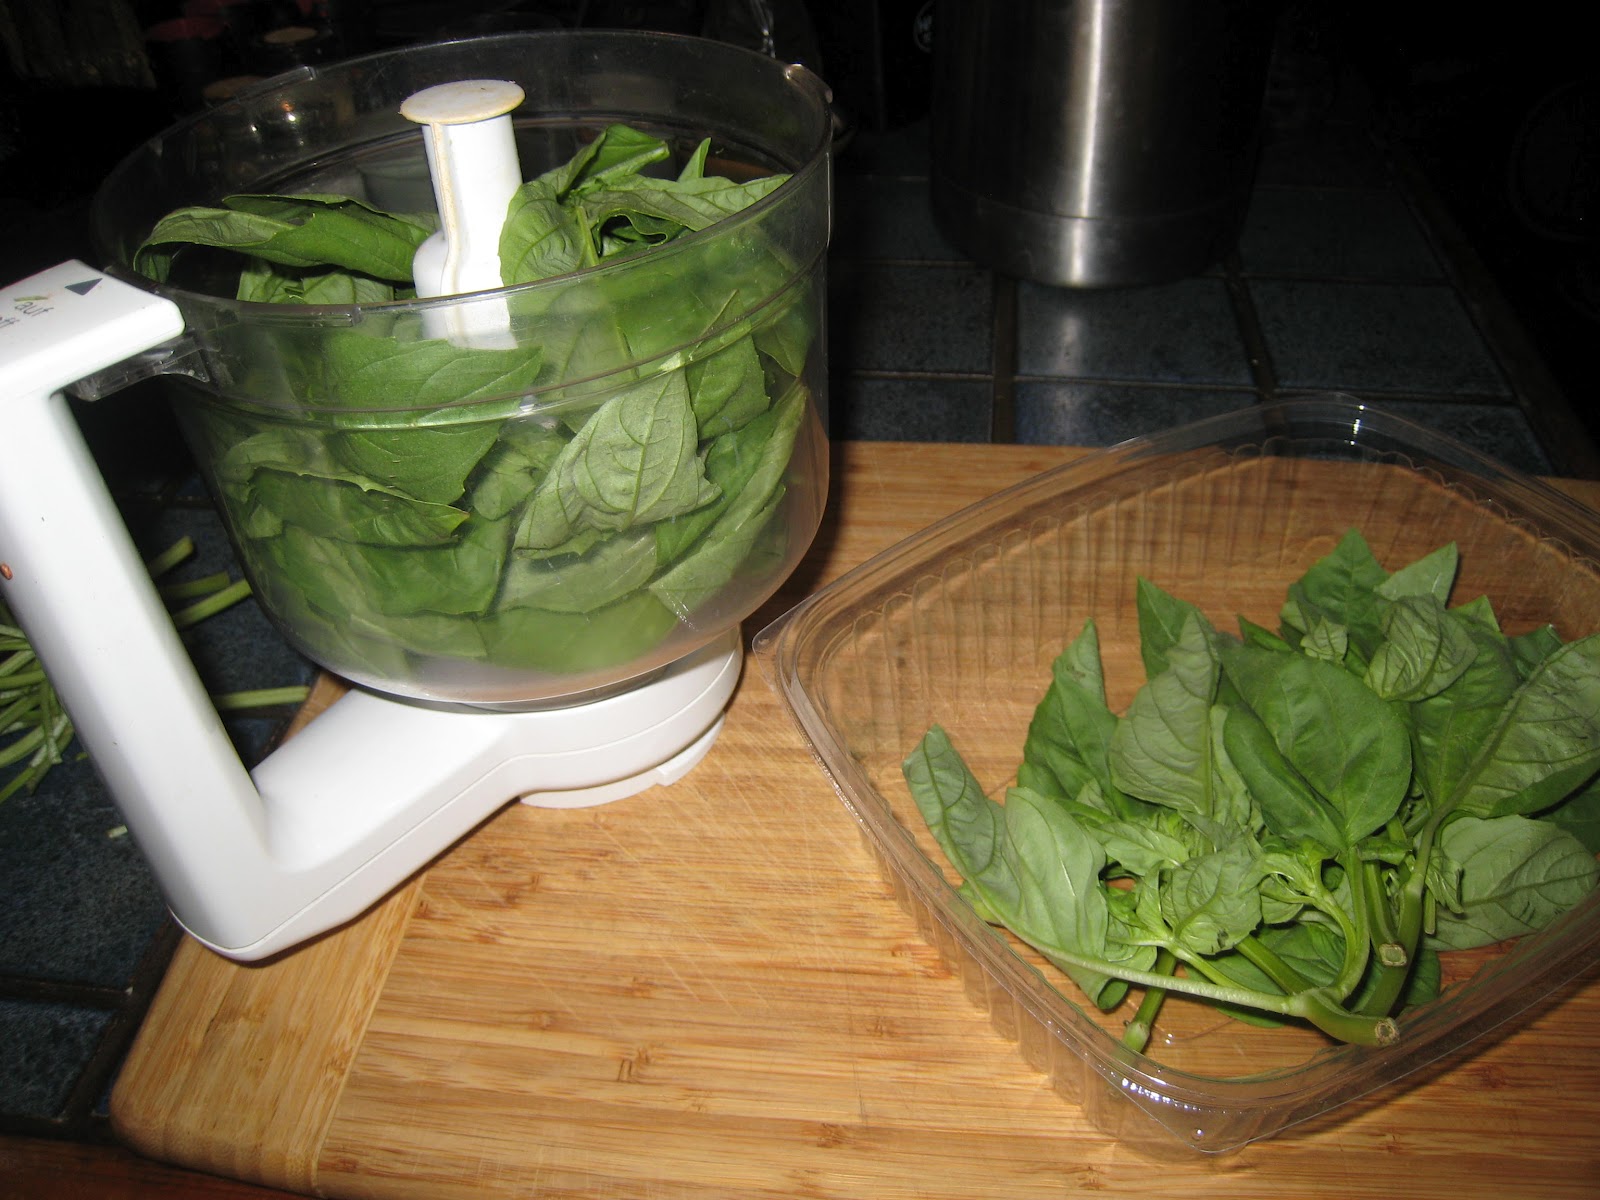
First put the basil leaves, 2 oz is about 2 cups, in a food processor. I've not tried making pesto in a blender, but it probably would work too.

Basil in food processor

Add 1/4 cup walnuts or pine nuts
1/2 cup extra virgin olive oil
3 large cloves of garlic
pinch of salt

Process, then add 1/2 cup of shredded parmesan.

Walnuts, garlic, olive oil added to basil in food processor


Processed Basil Walnut Pesto


PESTO POTATO CHICKEN
- I cook up a chicken breast or two in plenty of salted water to cover till tender. Remove the chicken to cool enough to shred.
- Cut a potato or two in match-stick pieces and add to the water you cooked the chicken in.
- About 10 minutes before you think the potatoes will be tender add about 1/4-1/2 pound of broken up fettucini pasta to the pot to cook till tender.

Match-stick cut potatoes cooking in chicken broth and added fettucini
My goal is to not have much liquid left by the time everything is done cooking. If you do have lots of liquid left, pour or ladle it off, or thicken it with arrowroot or cornstarch. Add the shredded chicken and toss with the pesto sauce and serve. I've made this with home-made pasta ... My favorite homemade pasta is sourdough pasta. I'll be posting that recipe in the future.

Potato, Pasta and shredded chicken, all cooked in chicken broth, tossed with basil walnut pesto


I made this pesto with my soaked and dried walnuts to test the flavor. Now that I know it's great, I'll be making a lot of the beginning process of the basil without the walnuts and parmesan for freezing - both in either freezer bags, containers, or ice cube tray portions.

For example - the ice cube portion of pesto is excellent on a baked halved tomato, adding the crushed nuts and grated parmesan on top, then broil a bit at the end. I use my frozen pesto on homemade pizza too. It's good tossed with cooked spaghetti squash and chopped tomatoes.  

February 3, 2012

Sauerkraut Stew


Sauerkraut, cauliflower, kale and kielbasa

Sauerkraut, potatoes, and kielbasa sausage has always been a family favorite food combination. Sometimes I'll saute up kielbasa cut in 1/2" slices to brown a bit and then add thin sliced onions and cabbage from our garden, kinda creating a fresh sauerkraut. This alone is great. I'll often add some chicken broth and thicken a bit. This is great over mashed potatoes. Sometimes instead of onions I'll use leeks - love leeks! Lately I'm adding kale and cauliflower. So that's what's pictured here.


Proportions?

1# sliced kielbasa, saute till golden.

Add:

1 thin sliced onion or chopped leak (make sure you cut the leek in half vertically and wash out all the dirt before chopping, and I like to use most of the green part too) - cook till they color.

Chopped kale, about 2 C - 4 large leaves (mine is frozen from last year's garden)

1/2 # cauliflower (mine is frozen from my garden)

Then add:

2 C sauerkraut, rinsed (I look for lowest sodium - usually fresh in refrigerator section)

2-4 C chicken broth, depending on how soupy you like it. I'll use the 4 cups broth if I add some potatoes.

Salt and pepper to taste - with the sauerkraut I never salt, unless adding potatoes needs extra flavoring.

We like to serve it with a dollop of homemade yogurt or sour cream.

April 28, 2011

Spring Fever

I've got the fever ... to get out in the dirt! I took these pictures early this morning and my hands were freezing as time wore on. But today is supposed to get up in the mid 60's, so I'm heading out soon to clean up all my perennial beds. I'm going to pull around a tarp the take my giant scissors, cutting back all the dead top growth, and rake the beds. I've got a lot of wildflower seeds - mainly annuals - to reseed some beds.


"Glory of Snow" bulbs in my grass
I used our electric drill and a 1/2" bit to plant 100's of the above flower bulbs in our grass several years ago. I guess that's one way to aerate!


Tansy
To the left of the above tansy plants are my first two perennial beds to the east of our front porch. Monte had brought the soil up from the woods. Wild raspberries came with the soil and I let them grow along with my flowers. So far they are the better producers of raspberries than the ones I've purposely planted. We freeze quite a bit of raspberries. The yellow flower heads of tansy dry beautifully.


Nights still freezing - frozen bird bath and old Sunflower head
I've not successfully planted sunflower seeds and gotten great plants. The chipmunks do the better job of planting birdseed sunflowers. All I have to do is pull out the extra hundreds!


The Herb Garden
I made herb labels several years ago out of Sculpey dough you bake in the oven rather than buy the expensive ones at the nursery. They're just tied with twine to bamboo poles. I could see the winter savory, thyme, sage, lemon balm, and oregano starting to send out green shoots. Behind this bed the tarragon, lavender, and sweet cicely bushes are popping up too. And then there's the crab apple tree ready to burst into bloom - by the end of the summer it's totally entwined with a clematis vine.


Chives readying to bloom


Autumn Sedum Joy beautifies the winter garden


Forsythia starting to bloom


Greenhouse garden seedlings started
I started my seedlings a bit late this year, but it'll be ok. There's broccoli, cauliflower, kale varieties, tomatoes, and then nasturtiums, clary sage, marigolds ... I've got to start basil, winter squash and more things next.


Clematis entwined in grapevine in greenhouse and green tomatoes


Grapevine needing to be pruned - starting to invade potted plants
Related Posts Plugin for WordPress, Blogger...